Early October last year, I learned that Emmanuel Silva was offering a watercolor florals masterclass. I have been following his Facebook page and he paints realistic watercolor art. I really wanted to learn how. Flowers are the subjects I paint the most and I wanted to paint them realistically so I enrolled.
Classes were conducted online through zoom. There were six reference photos to be turned into a watercolor pieces. At least two 4-hour sessions per week were devoted to the lesson. In case I missed a session, videos of the lessons were saved in a Google classroom which I have a lifetime access. The advantage of being present while the teacher paints was that I could ask questions which he could instantly answer. We did have a messenger group where one could also ask questions to the teacher or chat with other classmates. Before each session, the teacher posted the reference photo, his pencil drawing of the reference photo and the materials to be used.
The first piece was the terry flared tulips. The special feature of the piece was that there was a crochet doily on the table and it required the use of a masking fluid. A masking fluid is a liquid you can paint on an area that you do not want to be colored. The fluid leaves a thin film on the paper that prevents pigment from seeping which can be removed when it dries.
This was the first time I used a masking fluid.

This was how it looked when removed.

I clearly missed some parts that were supposed to be masked. I had a clear masking fluid so I thought I masked them all.
Because I missed some areas to be masked, I got specks of the background in the petals. The doily also looked like it had some rips because of the unmasked parts. Let us just say that this is part of the charm of my piece. Ha! I continued following Sir Emman’s video until I finished it.
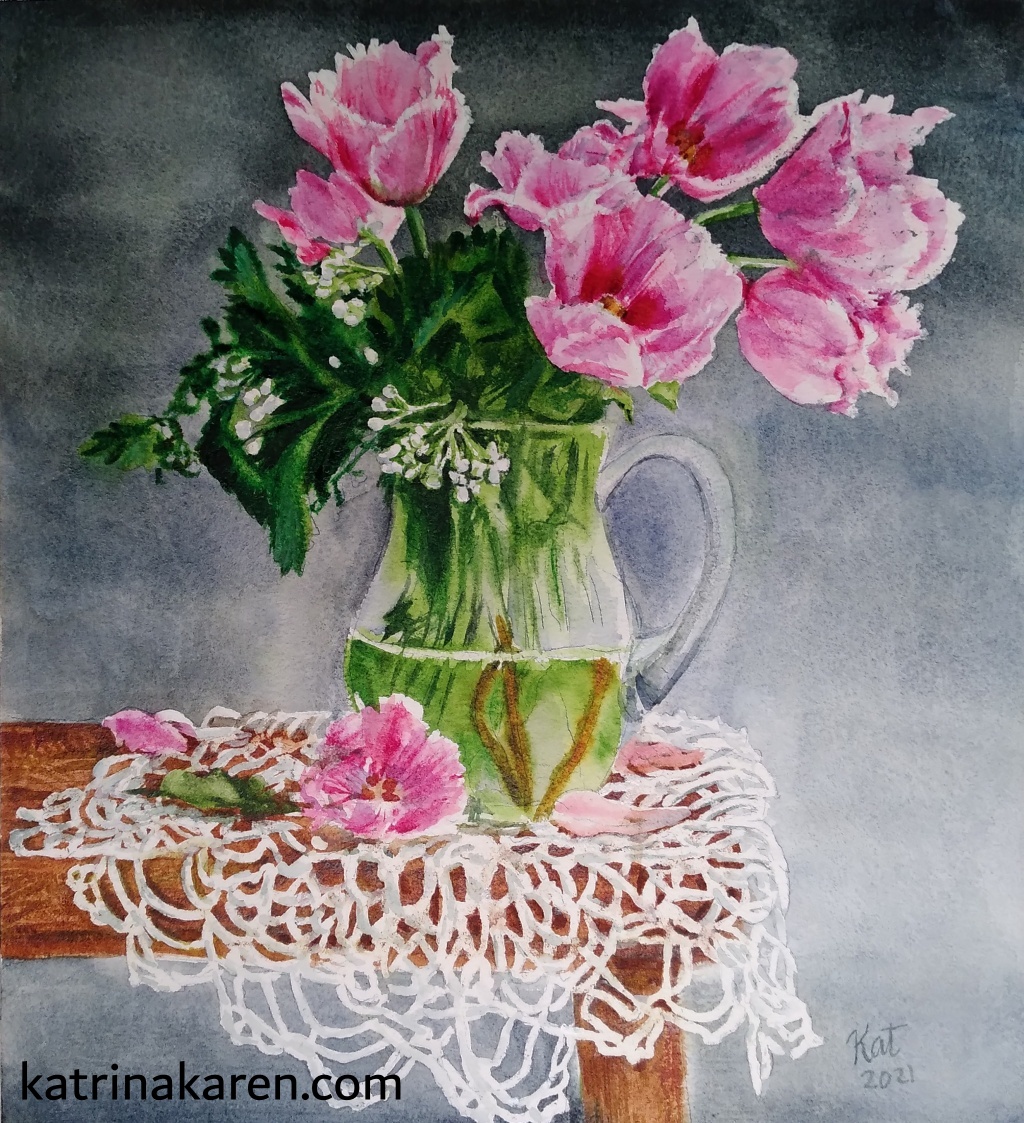
I gave this artwork as an exchange gift in a Christmas party with other artists. Another artist can now nitpick on my mistakes. Ha! I am a brave one. I should have thought this through when I chose a work as exchange gift.
The next piece was white peonies on porcelain. The special features of this painting that I must be able to work on were the white blooms, porcelain jar and the velvety fabric.
I botched the fabric.

This was the first time I learned about glazing in watercolor. Glazing is adding a wash over an underpainting. The underpainting sets the tone of the piece and when it dries, another transparent wash is painted over it to get the final color. Final color pops. In my case, I forgot to let the underpainting dry. When I applied the wash, the underpainting was wiped off with my strokes. Arggh.
Lesson learned. I just painted it the way I would paint it had I not taken the class. I need to be mindful of the mistake next time.

The third painting was the one with yellow daffodils. The special feature of this painting were the yellow daffodils, earthenware jar and the wooden table.
Knowing how I botched my cloth in the previous piece, I was careful this time around.

I realized also that I do not have that much yellow pigments in my watercolor selection of tubes.

For now, I just have to make the most of what I have.

The fourth piece was the white glory bush. The special features of this piece are the dewdrops and the dark, shiny leaves. This is my best output in the masterclass. (Ako lang ang judge, guys. hahaha ) After this, I felt like I can start painting all the reference photos in my files all these years.
I was amazed how the dark shiny leaves were done-just quick strokes, pure pigment and lots of confidence- that it would turn out okay.

This photo is the proof that I really did this painting. Hahaha

I love the bokeh effect of the background. (Buhat bangko moment haha)

The fifth piece was the one with roses, peonies and mocks. This is the only piece that the teacher did not use a masking fluid to protect the blooms. I tried to keep the background as light as possible that when I left it to dry I thought I had wax paper over it when I glanced over it.

Instead of masking, the teacher used a wash of the background and lifting the paint in the blooms part. Lifting the paint is done by removing the wash with a clean brush and clean water.

Of the six reference photos, this is the piece I wanted to paint the most. I like the colors and the dreamy feel of the piece. Of the six pieces, this output is the least that I like. I was not precise with the lifting of background to make way for the blooms. I missed a few spots because I can no longer see the pencil marks. I was painting by following the teacher’s strokes. I was also not that careful with adding another layer of wash that it does not look as flat as I wanted it to be. Maybe I will go through it some other time and correct my mistakes so for now, this is how it looks.

Christmas time came and I don’t know why I was swamped with things to do. The holiday came like a blur but my heart was happy. I was only able to do the 6th piece by mid-January. By this time, the masterclass was long over and I was trying to get my painting groove back as I have art pieces and commissions that I still have to do this year.
The sixth piece was an assortment of blooms in a glass jar. The special features of this piece were the varied blooms, foliage and the dark green background. I did not check the color guide in the google classroom. I just followed the video and when I did not have the perylene green pigment, I just mixed the greens that I have so I ended up having a lighter shade.

I still forget about the wash covering the pencil marks that I no longer got to see which parts I was painting. I was following the teacher’s strokes and just hoped for the best.

I have finished all 6 paintings and I am writing down what I have learned so I won’t forget.
1. Ultramarine blue and burnt umber make grey. Before the masterclass, my most used pigment is titanium white. In all the pieces, we did not use any whites or blacks. It makes sense not to use white because the paper is already white. Before, I used titanium white to correct my mistakes (like a correction fluid?! Ha). Now I know better.
2. Wet the back of the paper. Making sure that the back of paper is wet when painting is an assurance that the piece lay flat and that the paper expands and stretches well. I used to be a tight painter. I used to paint with small brushes and paint small strokes at a time so I can avoid the warping so I seldom have a wet paper. Now my problem with buckling is solved with wetting the back of the paper. I just have to make sure I am using 100% cotton 300 gsm watercolor paper.
3. Wet the front surface of paper before painting if you want gradient. If you happen to notice my previous pieces, I usually fill my paper with subjects. I do not have a background because my background tends to have streaks because I do not wet it beforehand. Now I get beautiful gradient as background.
4. Get a colored masking fluid. Schmincke has a blue one. I should get that before I start doing watercolor paintings on my own. I have a clear one and I tend to miss some spots because I thought I already applied it.
5. Angular brushes are wonderful tools. I used to be a round brush person. Size 2 and 4 natural round brushes are always in my arsenal. Now, angular brushes are my frequently used brushes. It is easier to create defined edges and lines with angular brushes. Brushes are expensive but I think I need a few more. I have yet to decide what sizes I need next.
6. A good drawing makes a lot of difference in realistic paintings. The teacher gives us access to the reference photo and his drawing. It is really hard to achieve a realistic watercolor floral painting without drawing the subject first. The botanical parts require precision to be realistic. I still use grids in drawing. It must be nice to learn proportions by constant practice without using grids. I hope someday I will be able to do that. I should try to sketch every day.
7. Use the darker pencil when doing the final drawing. My drawing was often unrecognizable after painting the background wash which made it difficult for me to determine which part I was painting. I should use darker pencil over the sketch. Also, when I removed the masking fluid, the sketch was removed as well. In the video, the teacher would patiently redraw the initial sketch while I just draw half-heartedly. I was too eager to paint that I just do a rough sketch over the initial detailed one.
8. Patience is great virtue to develop. There are art pieces that took the teacher more than two sessions to finish. There are a lot of waiting to dry, wetting, changing water and testing the mix. Plus, there is also strategizing what steps to take: should masking fluid be used, which area to mask, what pigments to use, which parts to start painting. The teacher would say be careful in this area you might paint over the highlights or this pigment may be difficult to lift. In my mind, I would say, “Nah, I like to be reckless.” Not really. Sometimes, I was just not patient enough.
9. Learn the properties of the pigments. I only learned recently about transparency, granulation and staining colors. Different pigments have different chemistry that I am still not familiar with. I do not do swatches of the pigments that I have. I should try to do that because it helps to know them and not repeatedly commit errors. Pigments are also expensive. It would be a waste to just randomly mix colors without prior understanding of the outcome.
10. Learn, unlearn, relearn. There were things that I used to do with watercolors that I need to unlearn in order to be open to new learnings. I might relearn them in the future and find my style and techniques. My art is the amalgamation of everything I learned, unlearned and relearned. My ultimate goal is finding joy in what I do. And there is joy in finding ways to be better with what I do. Thanks to this masterclass.
Here’s hoping that I would be able to paint more this year!
[…] enrolled in Emmanuel Silva’s Masterclass to improve my skills. By the way, Sir Emman is one of the top 5 watercolorists in the 35th Kulay sa […]